

Ladies Daisy Granny Square Jumper
Materials
Dk / weight 3 yarn
3.5 and 4 mm crochet hooks
I used what yarn I have in my stash. I needed to use some of it up before I buy any more! So I recommend raiding your stash and making your jumper with what you have already got, it will make it really unique and clear some stash too!
I enjoyed making mine and have started making a cardigan version, that will be available soon!
For the daisies I used
King Cole Cottonsoft DK in white (600 metres)
Antique Gold (200 metres)
Main colour
Elements Panoramic DK in shade Desert (1200 metres)
(4 balls) 60% Acrylic 40% Cotton (300 metres per 100g)
Edging
Hobbii Portobello shade 56 (140 metres)
For my example I made XL / 2XL size so the above metres will be less for the smaller sizes.
Written in English US terms with abbreviations for UK
sc = single crochet (double crochet in UK)
dc = double crochet (treble crochet UK)
slst = slip stitch
blo = back loop only (crochet into the back loop of the stitch
[ ] = in the same stitch
* * = repeat between
ch = chain
Gauge
The completed square should measure 4”
Pattern notes
This pattern will work with any 4” granny square of your choice.
You can join the squares any way that you like. I joined with the join as you go method, but had to join each square one by one as I was using the same ball of yarn for the last two rows. Video here
If you haven’t tried the join as you go before, I highly recommend giving it a try, its so easy once you have mastered it and can be applied to so many future projects!
I made round 3 and 4 with the main colour, joining on round 4.
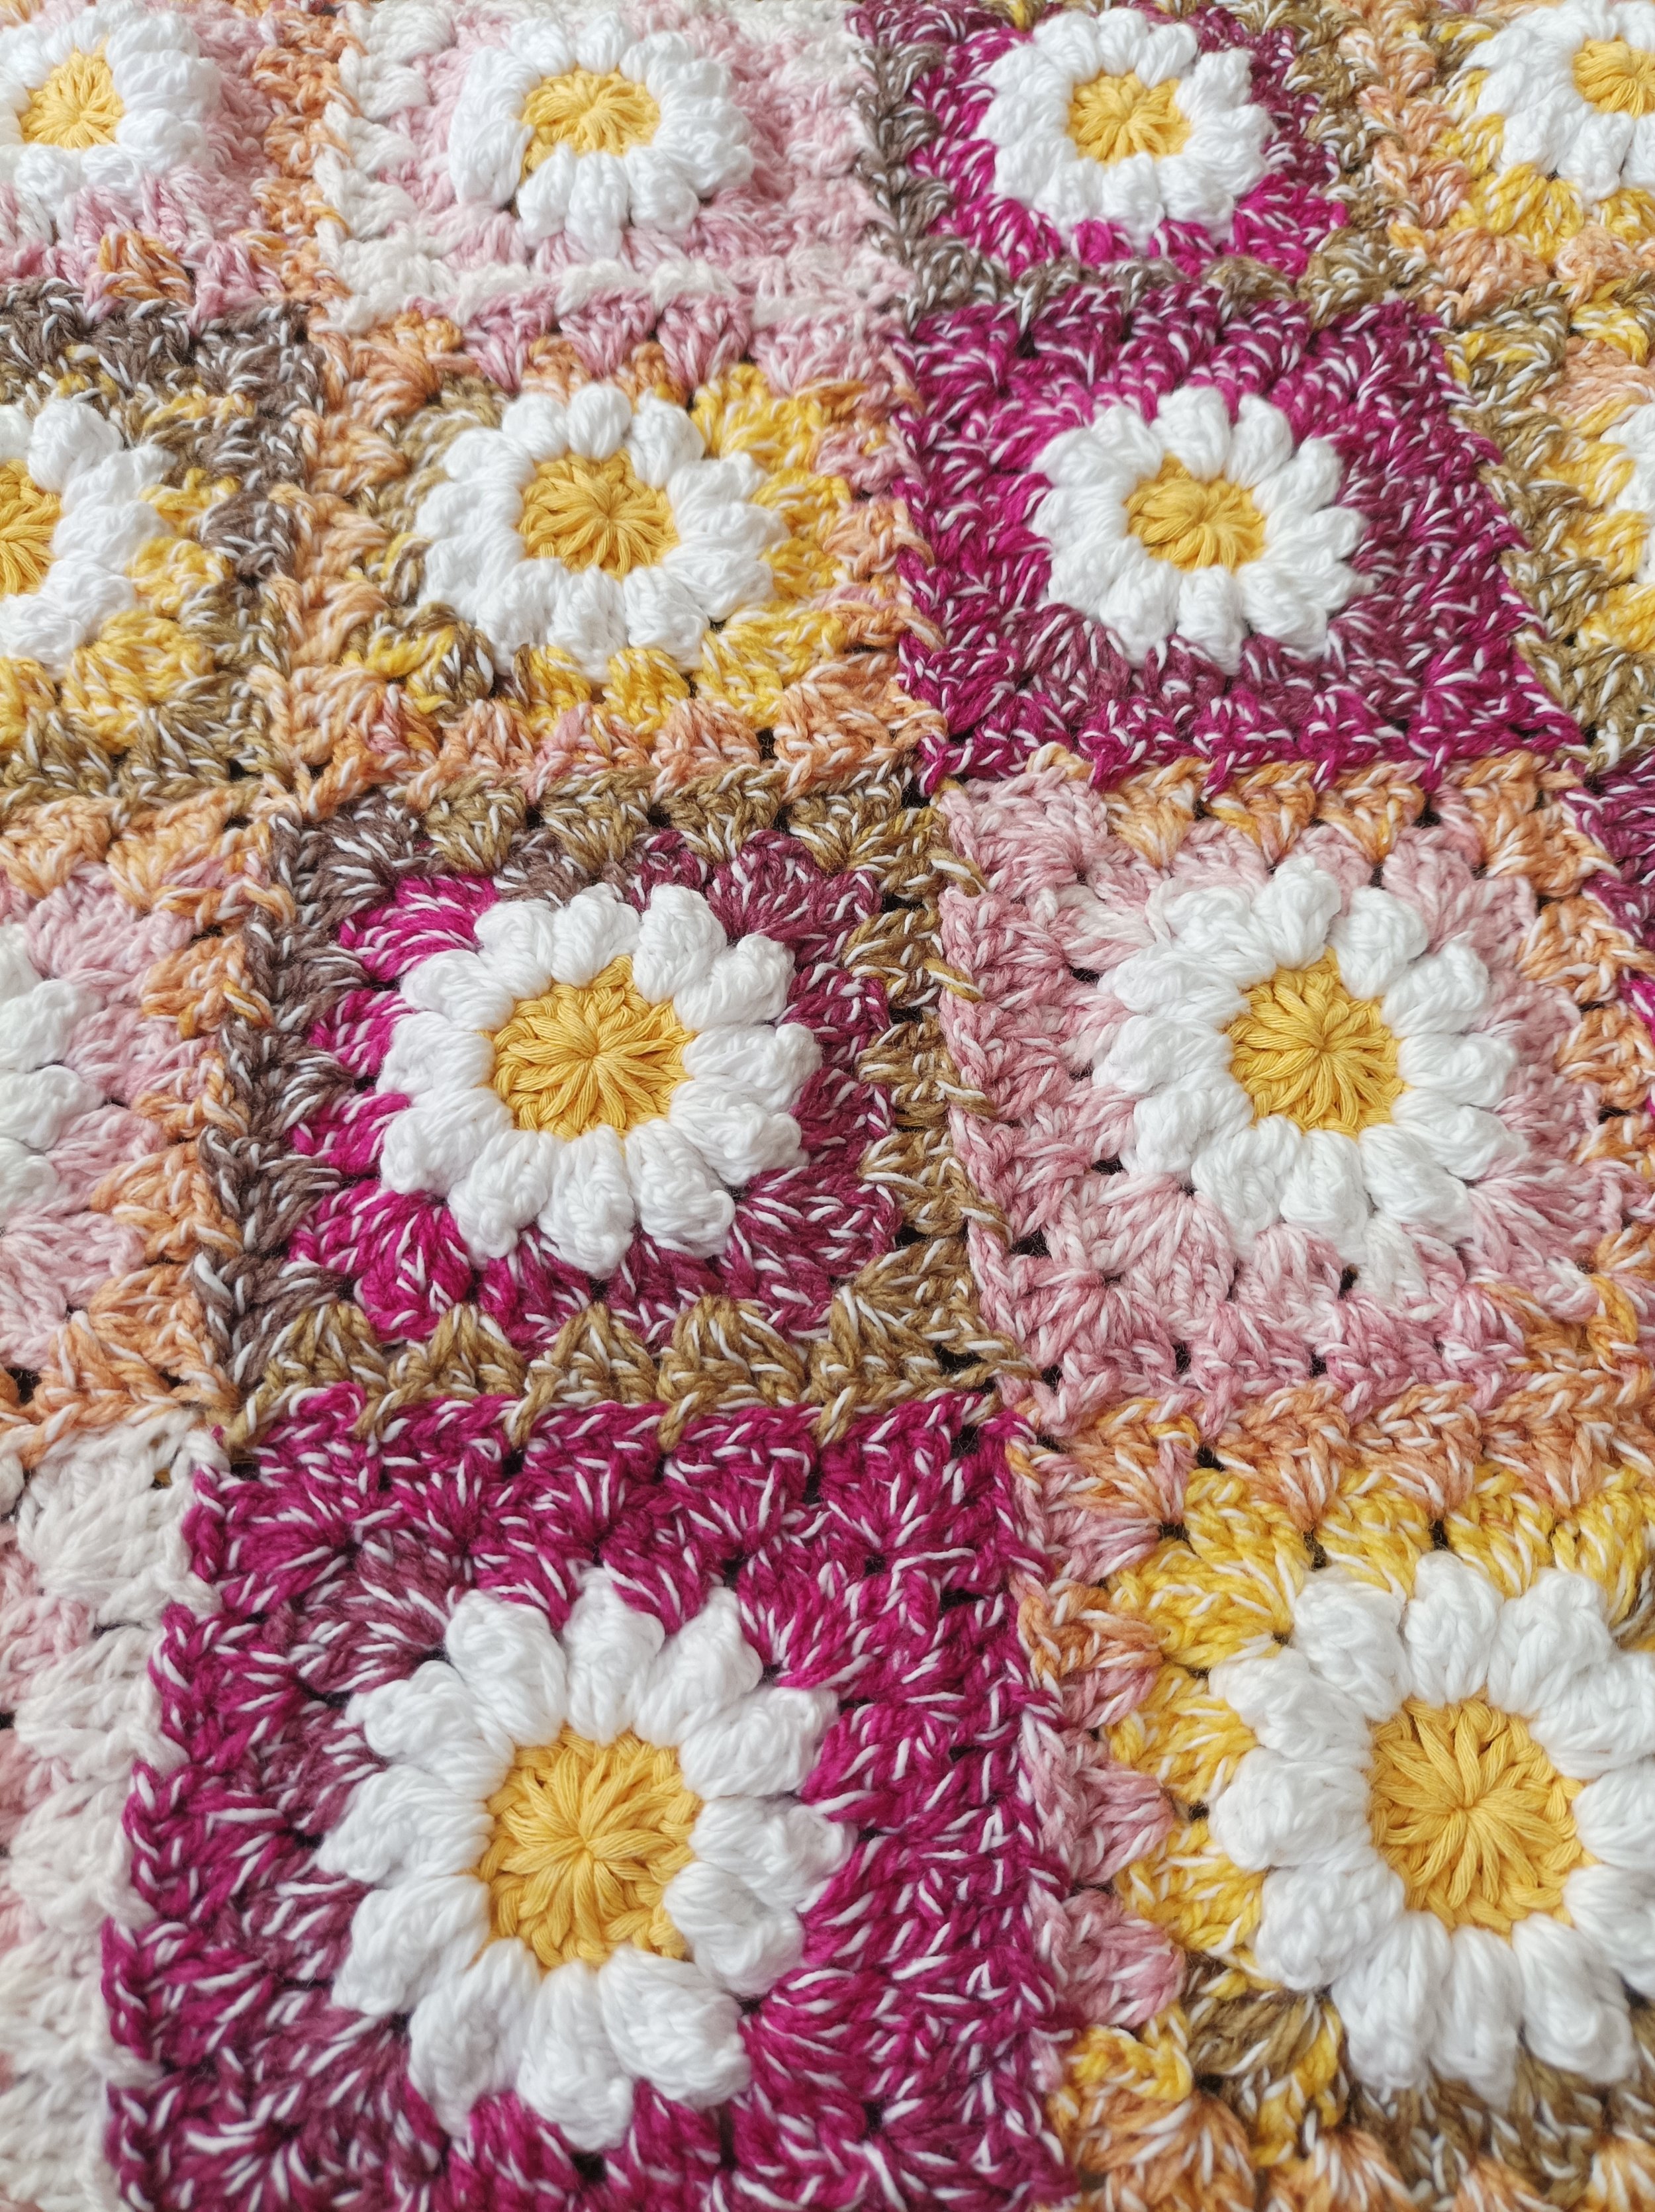
Each square turned out unique and I alternated where I placed them. I think it looks like a patchwork quilt.
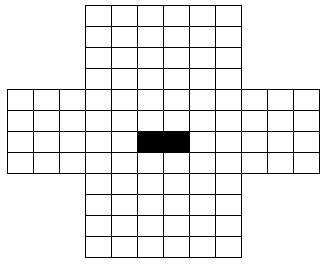
The below diagrams show the finished chest sizes, the square placements and required squares for each size. (I did an extra row of squares on my sleeves as I have long arms).
The ch3 counts as the first stitch.
The ch1 or 2 is not counted as a stitch.
The size medium needs two half squares for the neckline otherwise it will be too wide.
There are lots of different ways to alter the pattern to suit your needs, here are a few:
The jumper can be made longer by adding another row of squares or shorter by doing one less row of squares, the same applies with the sleeves.
If you are between sizes and don’t want your jumper to be too large you could make the smaller size and add a row or two of granny stitch down each side seam to make it a bit bigger.
You could also make the smaller size go up half a hook size to make your squares slightly bigger, or make the bigger size and go down half a hook size to make your squares slightly smaller.


Size XS/S finished chest 32” 62 Squares

Size M/L finished chest 40” 81 squares + 2 halfs

Size XL finished chest 48” 94 Squares
Daisy Square
Starting with yellow and 4mm hook
Round 1: make a magic circle, ch2 and work 12 dc into the circle, slst to the first stitch. (12)
Change to white
Round 2: [ch2, 3 dc] in same stitch, *remove hook from stitch and insert in top of first dc from front to back, insert into last dc and pull loop through, ch2, [4 dc] into the next stitch* repeat to the end, ch2, slst to the first stitch. (12 petals)
Join main colour in any ch2 space
Round 3: (Working in the chain spaces) [ch3, 2 dc, ch 2, 3 dc] in the same stitch for the first corner, [3 dc] in each of the next two ch2 spaces, *[3 dc, ch2, 3 dc] in the next ch2 space, [3 dc] in the next two ch2 spaces*, repeat twice more, slst to the first stitch, then slst to the ch2 corner space to start the next round. (48)
Round 4: [ch3, 2 dc, ch 2, 3 dc] in the same stitch for the first corner, [3 dc] in between each of the next three clusters below, *[3 dc, ch2, 3 dc] in the ch2 corner, [3 dc] in between each of the next three clusters below* repeat twice more, slst to the first stitch, then slst to the ch2 corner space to start the next round. (60)
Fasten off.
The square should measure 4”
After the first square is made, the next square will be joined on round 4 if doing join as you go.
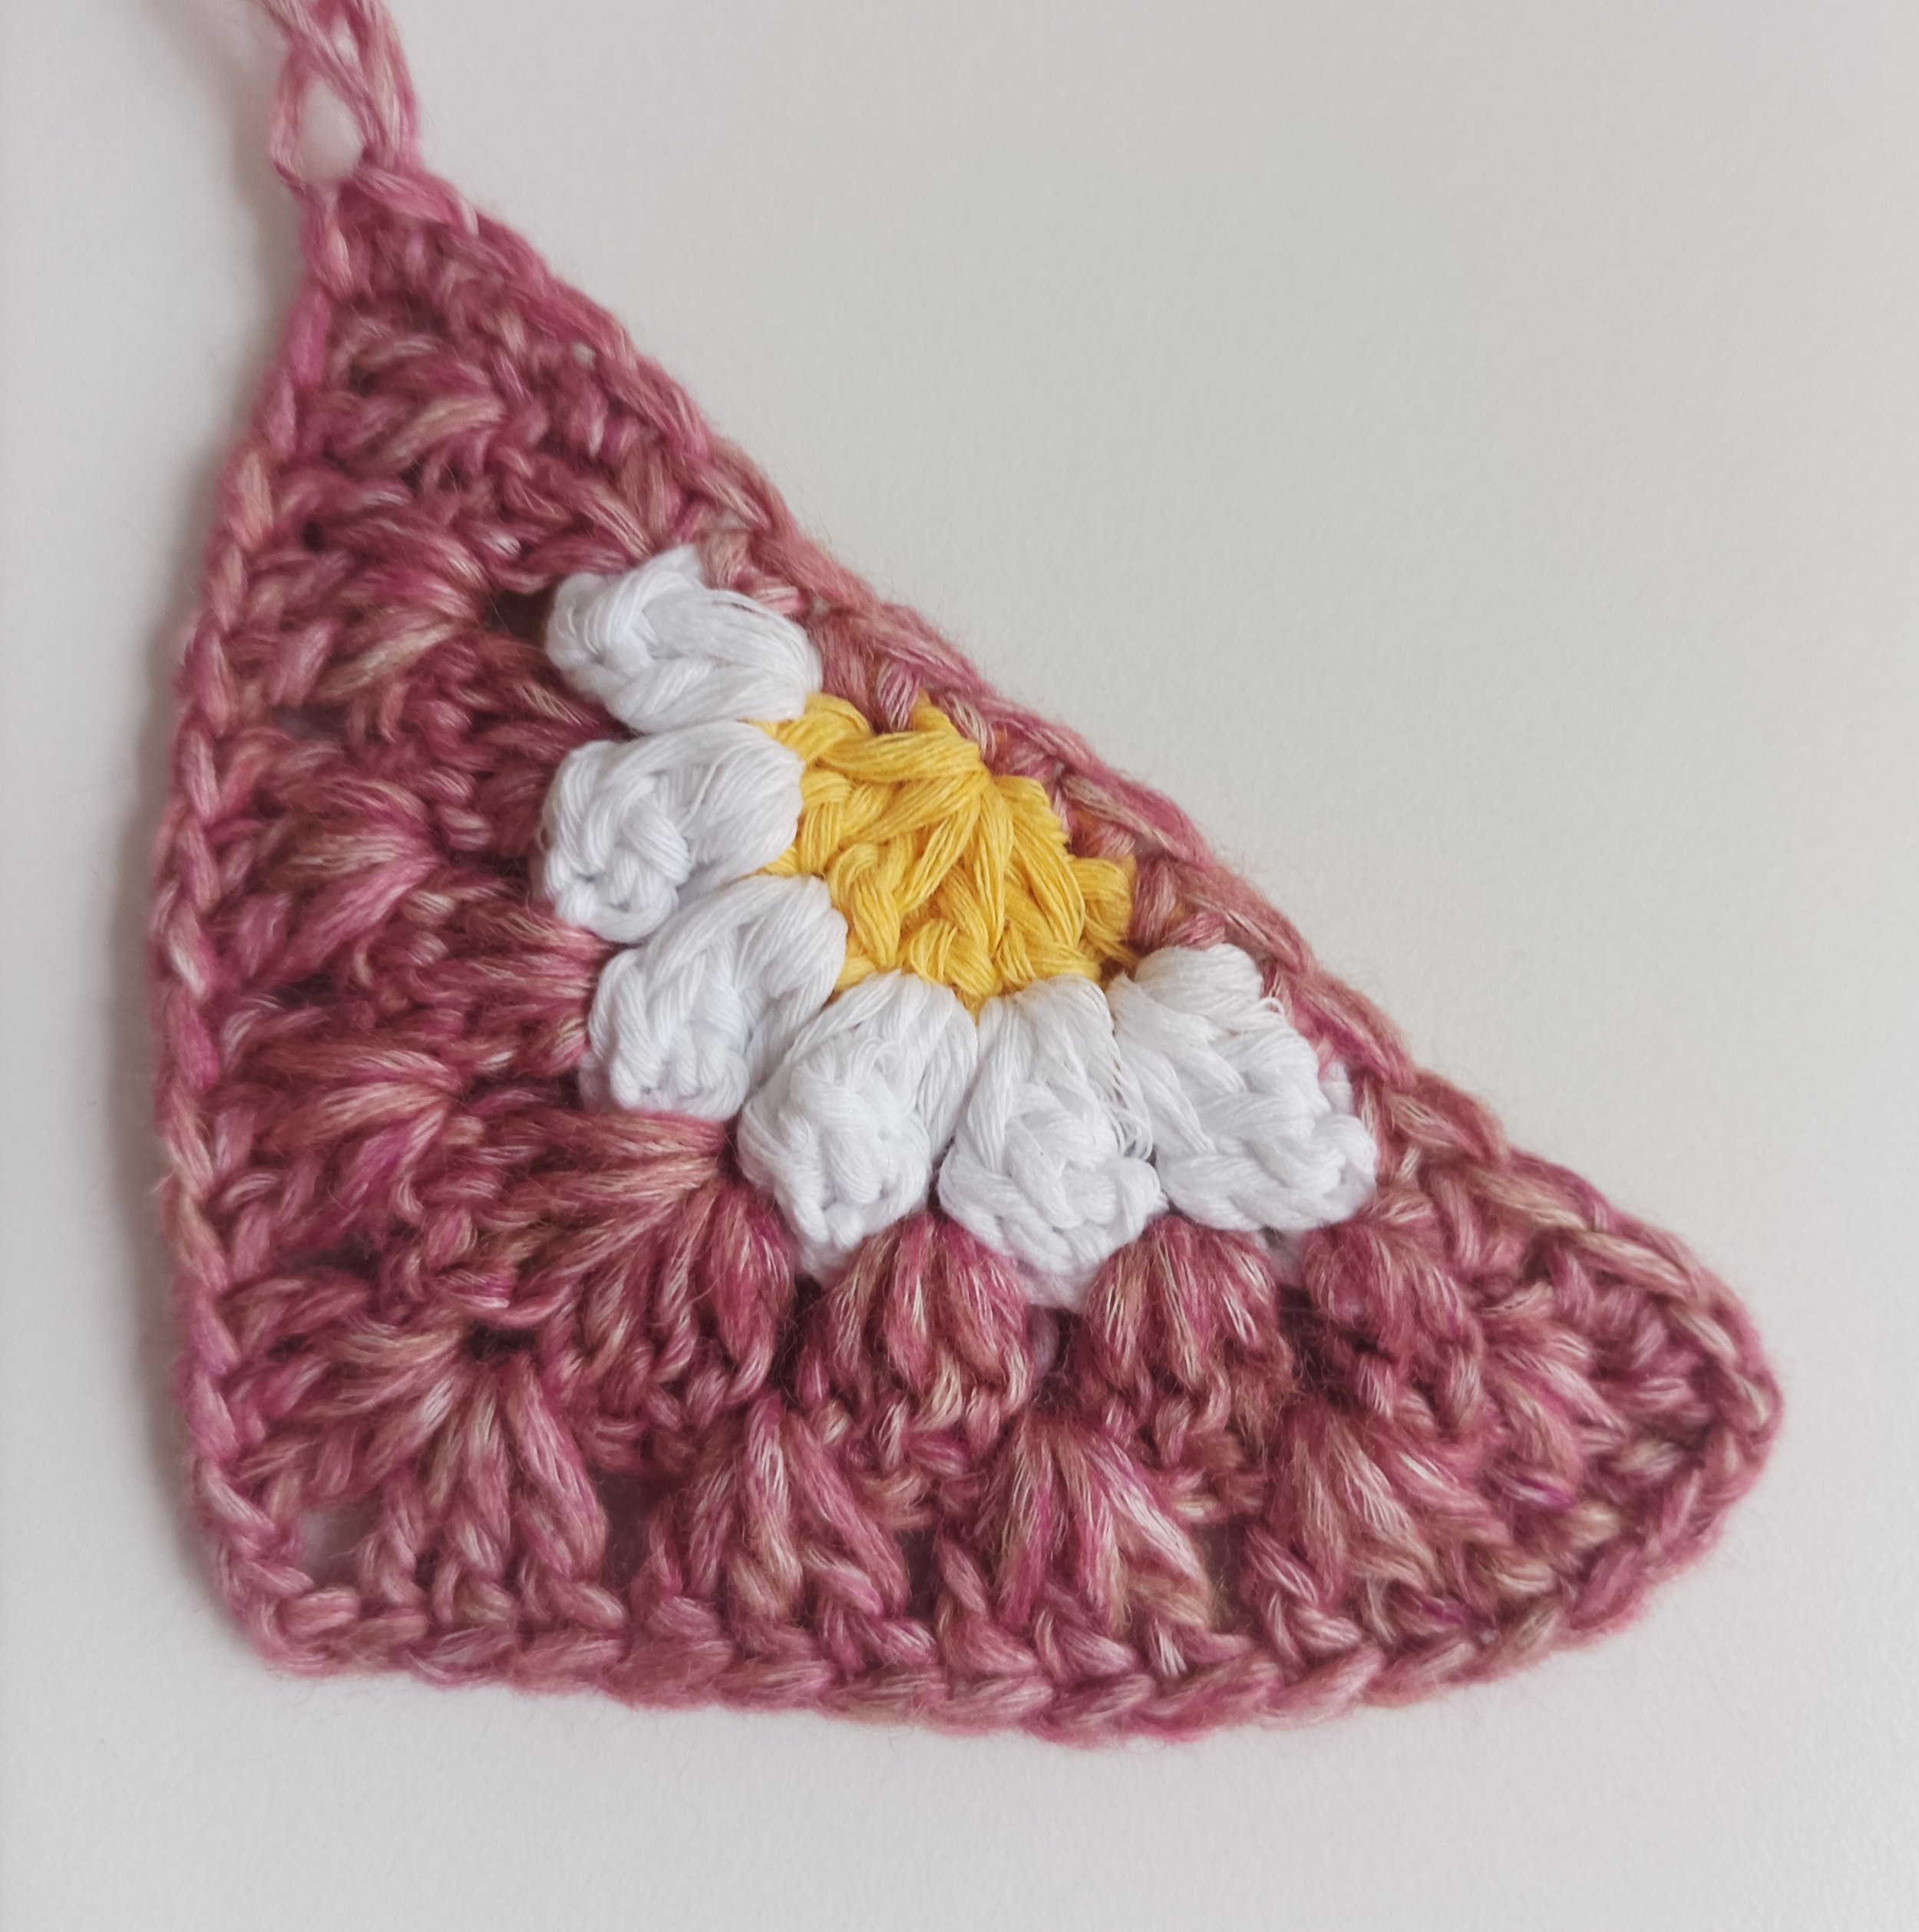
Half Daisy Square
Starting with yellow and 4mm hook
Round 1: make a magic circle, ch2 and work 6 dc into the circle, slst to the first stitch. (6)
Change to white
Round 2: [ch2, 3 dc] in same stitch, *remove hook from stitch and insert in top of first dc from front to back, insert into last dc and pull loop through, ch2, [4 dc] into the next stitch* repeat to the end, ch2, slst to the first stitch. (6 petals)
Join main colour at the end of the first petal
Round 3: [ch3, 2 dc] in the same stitch, [3 dc] in each of the next two ch2 spaces, [3 dc, ch2, 3 dc] in the next ch2 space, [3 dc] in the next two ch2 spaces, [3 dc] at the end of last petal. (24) Turn
Round 4: [ch3, 3 dc] in the same stitch, [3 dc] in between each of the next three clusters below, [3 dc, ch2, 3 dc] in the ch2 corner, [3 dc] in between each of the next three clusters below, [3 dc] at the end of last cluster, continue to sc across the unworked side, slst to first. (30)
Fasten off.
Neck edging
Using a 3.5mm crochet hook
Row 1: ch1, sc around the neck.
Row 2: ch9, sc in 2nd chain from the hook, sc in each chain back to the edge of the neck, join to the next stitch of the edge of the neck using a slst then work one more slst into the next stitch. (2 slsts in total for joining) (8) Turn
Row 3: ch1, sc 8 in blo. (8) Turn
Row 4: ch1, sc 8 in blo, join to the next stitch of the edge of the neck using a slst then work one more slst into the next stitch. (2 slsts in total for joining) (8) Turn
Repeat Rows 3-4 until you get to the other side of the neck and sew the seam.
Start the neck here (first photo), working around the back of the neck, then as approaching the front corner and after the corner slst 3 stitches instead of 2, I did this 6 times, then the same at the last corner, it helps shape the neckline.


Bottom edging
Using a 3.5mm crochet hook
Row 1: ch1, sc around the bottom.
Row 2: ch9, sc in 2nd chain from the hook, sc in each chain back to the edge of the bottom, join to the next stitch of the edge of the bottom using a slst then work one more slst into the next stitch. (2 slsts in total for joining) (8) Turn
Row 3: ch1, sc 8 in blo. (8) Turn
Row 4: ch1, sc 8 in blo, join to the next stitch of the edge of the bottom using a slst then work one more slst into the next stitch. (2 slsts in total for joining) (8) Turn
Repeat Rows 3-4 until you get to the other side of the bottom and sew the seam.
Cuffs
Using a 3.5mm crochet hook
Row 1: ch1, *sc, sc 2 together* around the cuff.
Row 2: ch9, sc in 2nd chain from the hook, sc in each chain back to the edge of the cuff, join to the next stitch of the edge of the cuff using a slst then work one more slst into the next stitch. (2 slsts in total for joining) (8) Turn
Row 3: ch1, sc 8 in blo. (8) Turn
Row 4: ch1, sc 8 in blo, join to the next stitch of the edge of the cuff using a slst then work one more slst into the next stitch. (2 slsts in total for joining) (8) Turn
Repeat Rows 3-4 until you get to the other side of the cuff and sew the seam.
I would love to see your makes feel free to share #daisygrannysquarejumper @babycrochetdesigns Instagram, Pinterest and Facebook.
*COPYRIGHT 2023 This pattern is made for personal use only. You may not copy, share or sell this pattern. You may make and sell items made from my patterns but please credit me in listings @BabyCrochetDesigns as the designer many thanks*