
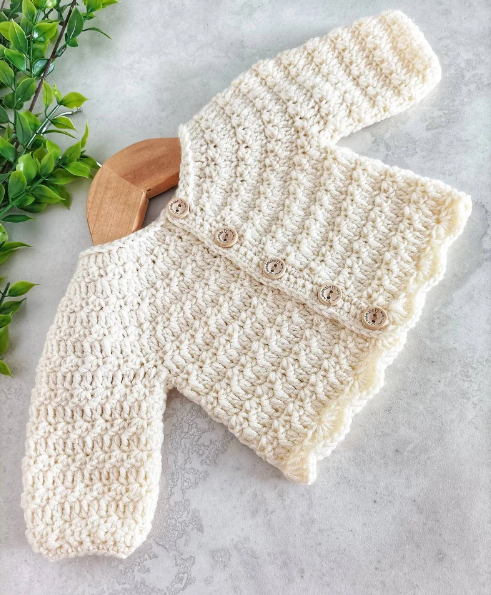
Harmony Cardigan
This cardigan is crochet all in one, starting from the top, made with a round yoke. It can be made with a choice of shell edging at the bottom or with a peplum bottom. It can also be made with a collar. It works up quickly and turns out extra cute.
The full written pattern with picture tutorial, including sizes preemie to 6 years can be found here
Written in English US terms with abbreviations for UK terms
sc = single crochet (double crochet in UK)
hdc = half double crochet (half treble crochet UK
dc = double crochet (treble crochet in UK)
ch = chain
slst = slip stitch
dec = decrease (crochet two stitches together)
blo = back loop only (crochet into the back loop of the stitch
** = Repeat between
[ ] = In the same stitch
Materials
700 metres of Dk / weight 3 yarn
4 mm hook
6-7 x 15 mm buttons
Gauge Square
With 4mm hook
Row 1: Ch12, dc in 4th ch from hook and each chain across. (9) Turn
Row 2-4: ch1, dc in the same, dc 8. (9) Turn
Square should measure 2 x 2 inches.
Pattern notes
If you don't want to make the collar crochet row 2 in the normal way and not blo.
Always ch1 and sc / hdc / dc in the same stitch to start the row, unless stated.
The buttonhole band can be made at either side.
The cardigan bottom can be left plain, there is also a choice of peplum bottom or shell edging.
When making the collar it may work better using a 5mm hook.
I also made a short sleeve version by just working four rows of the sleeve then added a shell stitch for the edging to match the bottom.
Size 5-6 Years
Ch63 with 4mm hook
Row 1: sc, in the second ch from hook, sc to end. (62) Turn
Row 2: (in blo) ch1, dc 5, [2 dc] in the next, *dc 1, [2 dc] in the next* x 25, dc 6. (88) Turn
Row 3: ch1, hdc 1, [sc, dc] in the next, *skip 1, [sc, dc] in the next* repeat to the last two stitches, hdc 2 together. (88) Turn
Row 4: ch1, dc 1, [2 dc] in the next, *dc 4, [2 dc] in the next* x 17, dc 1. (106) Turn
Row 5: ch1, hdc 1, [sc, dc] in the next, *skip 1, [sc, dc] in the next* repeat to the last two stitches, hdc 2 together. (106) Turn
Row 6: ch1, dc 7, [2 dc] in the next, *dc 5, [2 dc] in the next* x 15, dc 8. (122) Turn
Row 7: ch1, hdc 1, [sc, dc] in the next, *skip 1, [sc, dc] in the next* repeat to the last two stitches, hdc 2 together. (122) Turn
Row 8: ch1, dc 8, [2 dc] in the next, *dc 6, [2 dc] in the next* x 15, dc 8. (138) Turn
Row 9: ch1, hdc 1, [sc, dc] in the next, *skip 1, [sc, dc] in the next* repeat to the last two stitches, hdc 2 together. (138) Turn
Row 10: ch1, dc 9, [2 dc] in the next, *dc 7, [2 dc] in the next* x 15, dc 8. (154) Turn
Row 11: ch1, hdc 1, [sc, dc] in the next, *skip 1, [sc, dc] in the next* repeat to the last two stitches, hdc 2 together. (154) Turn
Row 12: ch1, dc 10, [2 dc] in the next, *dc 8, [2 dc] in the next* x 15, dc 8. (170) Turn
Row 13: ch1, hdc 1, [sc, dc] in the next, *skip 1, [sc, dc] in the next* repeat to the last two stitches, hdc 2 together. (170) Turn
Row 14: ch1, dc 6, [2 dc] in the next, *dc 11, [2 dc] in the next* x 13, dc 7. (184) Turn
Row 15: ch1, hdc 1, [sc, dc] in the next, *skip 1, [sc, dc] in the next* repeat to the last two stitches, hdc 2 together. (184) Turn
Row 16: ch1, dc 3, [2 dc] in the next, *dc 15, [2 dc] in the next* x 11, dc 4. (196) Turn
Row 17: ch1, hdc 1, [sc, dc] in the next, *skip 1, [sc, dc] in the next* repeat to the last two stitches, hdc 2 together. (196) Turn
Row 18: (Divide for Armholes) ch1, dc 30, skip 38, dc 60, skip 38, dc 30. (120) Turn
Row 19: ch1, hdc 1, [sc, dc] in the next, *skip 1, [sc, dc] in the next* repeat to the last two stitches, hdc 2 together. (120) Turn
Row 20: ch1, dc to end. (120) Turn
Repeat rows 19-20 until work measures approximately 14” from the shoulder if doing a peplum bottom ending with a row 17 or 16” from shoulder if doing shell edging.
Peplum bottom
Row 1: ch1, dc 4, [2 dc] in the next 112 stitches, dc 4. (232) Turn
Row 2: ch1, hdc 1, [sc, dc]Round 3: ch2, [2 dc, dc in the centre dc 2 rows below, 2 dc] in each ch1 space, slst to the first. (30) in the next, *skip 1, [sc, dc] in the next* repeat to the last two stitches, hdc 2 together. (232) Turn
Row 3: ch1, dc to end. (232) Turn
Row 4: ch1, hdc 1, [sc, dc] in the next, *skip 1, [sc, dc] in the next* repeat to the last two stitches, hdc 2 together. (232) Turn
Row 5: ch1, dc to end. (232)
Continue to the button bands.
Shell edging
Complete the button bands first, then continue as follows
Row 1: ch1, sc 1, skip 1, [6 dc] in the next, skip 2, sc, *skip 2, [6 dc] in the next, skip 2, sc in the next* repeat to the end.
Collar
Working in the front loops from row 2 join yarn in the first stitch 62
Row 1: ch1, sc 5, [2 sc] in the next, *sc 3, [2 sc] in the next* x 13, sc 4. (76) Turn
Row 2: ch1, sc 3, [2 sc] in the next, *sc 4, [2 sc] in the next* x 14, sc 2. (91) Turn
Row 3: ch1, sc 1, *skip 2, *6 dc in the next, skip 2, sc in the next* repeat to the end.
Sleeves
With a 4mm hook
Row 1: with the right side facing, join yarn to first unworked stitch under the arm, ch1, dc 42, slst to the first. (42) Turn
Row 2: ch1, [sc, dc] in the same, skip 1, *[sc, dc] in the next, skip 1* repeat to the last, slst to first. (42) Turn
Row 3: ch1, dc to end, slst to first. (42) Turn
Repeat rows 2-3 until the sleeve measures 16.5” from the shoulder, then continue to the cuffs.
Cuffs
Row 1: Turn, ch1, sc 2, dec, *sc 1, dec* x 12, sc 2, slst to the first. (29) Turn
Row 2: ch1, sc to the end, slst to the first. (29) Turn
Fasten off and repeat for the other sleeve.
Button Band
Continuing from the bottom
Row 1: ch1, sc up to the top. Turn
Row 2-3: ch1, sc all. Turn
Buttonhole Band
Row 1: Starting at the right top side, join yarn, ch1, sc down to the bottom. Turn
Mark out with stitch markers or scrap yarn where you want the button holes.
Row 2: ch1, sc all, but ch1 and skip where the stitch markers are to make the button holes.
Row 3: ch1, sc all including the ch1s.
Fasten off and sew buttons to match the button holes.
I would love to see your makes feel free to share #harmonycardigan @babycrochetdesigns Instagram, Pinterest and Facebook.
*COPYRIGHT 2023 This pattern is made for personal use only. You may not copy, share or sell this pattern, you may make and sell items made from my patterns but please credit me @BabyCrochetDesigns as the designer many thanks*