
Ayla Beanie Free Crochet Pattern
Written in English US terms with abbreviations for UK
sc = single crochet (double crochet in UK)
hhdc = herringbone half double crochet (herringbone half treble crochet UK)
Yarn over, insert hook into next stitch and pull up a loop (3 loops on hook) pull first loop straight through the second (similar to a slip stitch). Yarn over, pull through two remaining loops on hook.
ps = puff stitch (insert hook into stitch, pull up a loop, *yarn over, insert hook into same stitch, pull up a loop* x 3, (8 loops on hook) yarn over pull through 8 loops, ch1 to finish.
blo = back loop only (crochet into the back loop of the stitch
ch = chain
slst = slip stitch
** = repeat between
[ ] = in the same stitch
Materials
3.5 and 4mm crochet hook
Dk / weight 3 yarn
needle
Pompom maker or fur pompom
Gauge
With 4mm hook
9 hhdc x 6 rows = 2” x 2”
Preemie (4-6lb)
Using 4mm hook
Round 1: ch4, slst to first to form a ring, ch2 and 10 hhdc in ring, slst to first. (10) Turn
Round 2: ch2, [2 hhdc] in all, slst to first. (20) Turn
Round 3: ch2, *hhdc 1, [2 hhdc] in the next* repeat to the end, slst to first. (30) Turn
Round 4: ch2, *hhdc 2, [2 hhdc] in the next* repeat to the end, slst to first. (40) Turn
Round 5: ch2, *hhdc 4, [2 hhdc] in the next* repeat to the end, slst to first. (48) Turn
Round 6: ch2, hhdc to end, slst to first (48) Turn
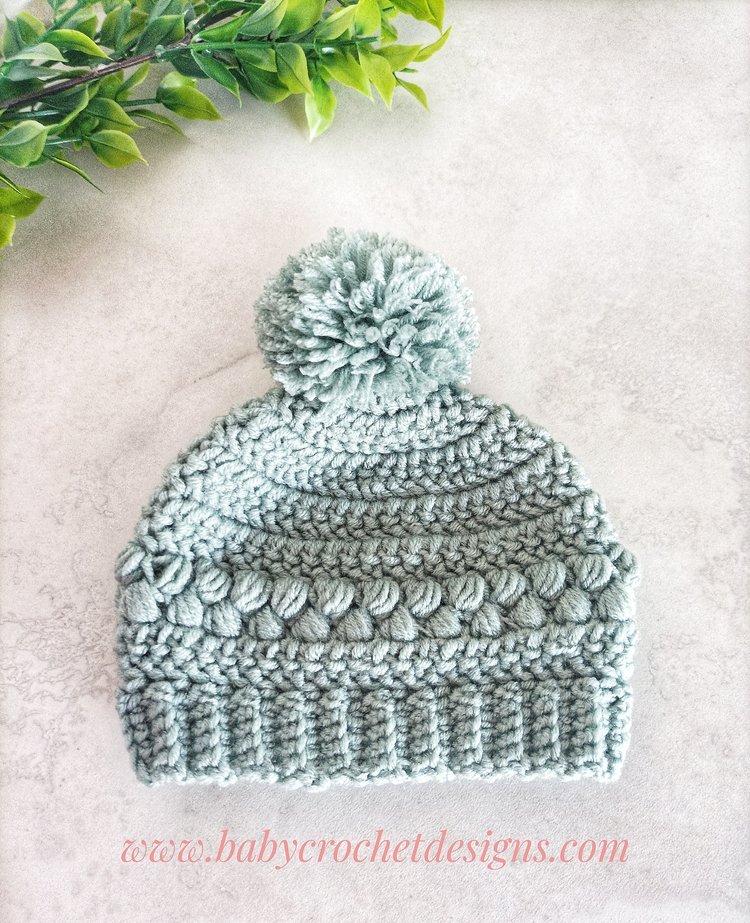
Repeat round 6 until the hat measures 2.25” tall and continue to the puff stitch pattern.
Puff stitch pattern
Using a 4mm hook
Round 1: ch1, *ps, skip 1* repeat to end, slst to first. Turn
Round 2: ch1, *skip 1, ps in each ch1 space* repeat to end, slst to first. Turn
Round 3-4: ch2, hhdc in each ps and ch1 space, slst to first. Turn
Continue to the rib edging.
Rib edging
Using a 3.5mm hook
Row 1: ch6, sc in 2nd ch from hook, sc in each chain back to the edge, join to the next stitch of the edge using a slst then work one more slst into the next stitch (2 slsts in total for joining) (5) Turn
Row 2: ch1, sc all in blo. (5) Turn
Row 3: (in blo) ch1, sc all back to the edge, join to the next stitch of the edge using a slst then work one more slst into the next stitch (2 slsts in total for joining) (5) Turn
If you havent done rib edging before here is a video how I do it (skip to 1:06:00)
Repeat rows 2 and 3 until you have worked all the way round, then sew the seam.
Attach a pom pom to the beanie. Fasten off and weave in the ends.
I would love to see your makes feel free to share #aylabeanie @babycrochetdesigns Instagram, Pinterest and Facebook.
*COPYRIGHT 2023 This pattern is made for personal use only. You may not copy, share or sell this pattern, you may make and sell items made from my patterns but please credit me @BabyCrochetDesigns as the designer many thanks*