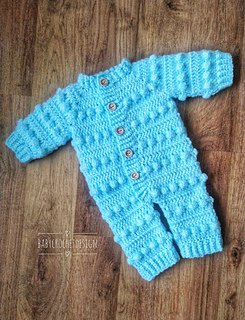
Bobbi Romper
This cute bobble baby romper is made using a simple dc stitch for three rows then a bobble row. It's quick and easy to work up. Then the arm and legs cuffs are made with a sc rib stitch.
Preemie 4-6lb
Size to fit: 13 Inch chest Premature Baby
Materials
150 dk / 8ply / light worsted yarn
3 and 4 mm hook
5 x 15mm buttons
Written in English US terms with abbreviations for UK terms
sc=single crochet (double crochet in UK)
dc=double crochet (treble crochet UK)
bs=Bobble stitch- (yarn over, insert hook into next stitch, pull up a loop, yarn over pull through 2 stitches), four times, you should have 5 stitches on hook yarn over and pull through all 5.
ch=chain
inc=increase
dec=decrease
slst=slip stitch
Gauge Square
With 4mm hook
Row 1: Ch12, dc in 4th ch from hook and each chain across. (9) Turn
Row 2-4: ch1, dc in base of ch1, dc 8. (9) Turn
Square should measure 5 cm wide by 5 cm tall.
If you're out with a 4mm hook try a 4.5mm hook.
If you have problems hitting the length this is not too important, as measurement will be given to follow.
Pattern
Row 1-3: ch1, dc in same, dc all. (working in the round, slst to first.)
Row 4: *sc 2, bs, sc 2* repeat across (working in the round, it would end with a bs and slst to first.)
Ch40 with 4mm hook
Row 1: 1 dc in 4th ch from hook, 1 dc in each of next 4ch, (dc 2, ch1, dc 2 in next), 1 dc in each of next 5ch, (dc 2, ch1, dc 2 in next), 1 dc in each of next 13ch, (dc 2, ch1, dc 2 in next), 1 dc in each of next 5ch, (dc 2, ch1, dc 2 in next), 1 dc in each of next 5ch. (53 including ch1s) Turn
Row 2: ch1, 1 dc in base of ch1, 1 dc in each of next 6, 3 dc in ch1 space, 1 dc in each of next 9, 3 dc in ch1 space, 1 dc in each of next 17, 3 dc in ch1 space, 1 dc in each of next 9, 3 dc in ch1 space, 1 dc in each of next 7. (61) Turn
Row 3: ch1, 1 dc in base of ch1, 1 dc in each of next 7, (dc 2, ch1, dc 2 in next), 1 dc in each of next 11, (dc 2, ch1, dc 2 in next), 1 dc in each of next 19, (dc 2, ch1, dc 2 in next), 1 dc in each of next 11, (dc 2, ch1, dc 2 in next), 1 dc in each of next 8. (77 including ch1s) Turn
Row 4: ch1, sc in same, sc 1, *bs, sc2* repeat to end. (77) Turn
Row 5: ch1, 1 dc in base of ch1, 1 dc in each of next 9, (dc 2, ch1, dc 2 in next), 1 dc in each of next 15, (dc 2, ch1, dc 2 in next), 1 dc in each of next 23, (dc 2, ch1, dc 2 in next), 1 dc in each of next 15, (dc 2, ch1, dc 2 in next), 1 dc in each of next 10. (93 including ch1s) Turn
Row 6: (Divide for arm holes) ch1, 1 dc in base of ch1, 1 dc in each of the next 11, 3 dc in next, skip next 20, 2 dc in next, 1 dc in each of the next 25, 2 dc in next, skip next 20, 3 dc in next, 1 dc in each of the next 12. (59) Turn
Row 7: ch1, dc in base of ch1, dc all. (59) Turn
Row 8: ch1, sc in same, sc 1, *bs, sc2* repeat to end. (59)
Row 9-11: ch1, dc in base of ch1, dc all. (59) Turn
Repeat rows 8-11 until work measures approx 10.5 Inches from the shoulder, ending so the next row is a dc row, slst to first and continue to legs.
Legs
Row 1: ch1, work 30 stitches, slst to first, leaving the rest unworked. (30) Turn
Continuing with the pattern until the leg measures 4 inches, then continue to cuff.
Cuffs
Change to 3mm hook
ch6
Row 1: sc in 2nd ch from hook, sc in each ch back to edge of leg, join to the next st of the edge of leg using a slst then work one more slst into the next st (2 slsts in total for joining) (5) Turn
Row 2: ch1, sc all in blo. (5) Turn
Row 3: (in blo) ch1, sc back to edge of leg, join to the next st of the edge of leg using a slst then work one more slst into the next st (2 slsts in total for joining) (5) Turn
Repeat rows 2 and 3 until you get all the way round, fasten off and sew the edges together.
Second leg
With the back facing, join yarn, continuing pattern, ch1, work 30 stitches (you will need to increase 1, slst to first. (30) Turn
Continuing with the pattern until the leg measures 4 inches, then continue to cuff.
Sew the small gap between the legs.
Sleeves
With 4mm hook
Row 1: With WS facing rejoin to first un-worked dc under arm, ch1, 1 dc in base of ch1, 1 dc in each of next 23, slst to first at beginning of row. (24) Turn
Repeat in pattern until the sleeve measures 6 inches, then continue with the cuff used for legs.
Fasten off and repeat for the other sleeve.
Collar (All sizes)
If not making a hood
Using a 3.5mm hook
With the back facing join yarn at the top right side, ch5
Row 1: sc in 2nd ch from hook, sc in each ch back to edge of collar, join to the next stitch of the edge of collar using a slst then work one more slst into the next stitch. (2 slsts in total for joining) (4) Turn
Row 2: ch1, sc all in blo. (4) Turn
Row 3: (in blo) ch1, sc back to edge of collar, join to the next stitch of the edge of collar using a slst then work one more slst into the next stitch. (2 slsts in total for joining) (4) Turn
Repeat rows 2 and 3 until you reach the other side of the collar. Fasten off.
Button band (All sizes)
Using 3.5mm hook
With front facing join yarn at the left bottom and ch6.
Row 1: sc in 2nd ch from hook, sc in each ch back to edge of front, join to the next row of the edge of front using a slst. (5) Turn
Row 2: ch1, sc all in blo. (5) Turn
Row 3: (in blo) ch1, sc back to edge of front, join to the next row of the edge of front using a slst. (5) Turn
Repeat rows 2 and 3 until you reach the top of the collar. Fasten off.
Buttonhole band (All sizes)
Using a 3.5mm hook
Mark out with stitch markers or scraps of yarn where you would like the button holes to be.
On the row for the buttonhole (sc 2, skip 1, ch1/2, sc 2), then on the next row, sc in the ch1 space. Video
Starting at the top right collar join yarn and ch6
Row 1: sc in 2nd ch from hook, sc in each ch back to edge of front, join to the next row of the edge of front using a slst. (5) Turn
Row 2: ch1, sc all in blo. (5) Turn
Row 3: (in blo) ch1, sc back to edge of front, join to the next row of the edge of front using a slst. (5) Turn
Repeat rows 2-3 until you reach the bottom of the cardigan, fasten off and sew the buttonhole band at the bottom.
Sew buttons at the other side to match up with the buttonholes.
Sew the buttonhole flap down
Hood edging
Using a 4mm hook
With the right side facing, join yarn in the first skipped stitch
Row 1: ch1, sc 4, join to the next row of the edge of the hood using a slst. (4) Turn
Row 2: ch1, sc all in blo. (4) Turn
Row 3: (in blo) ch1, sc back to edge of the hood, join to the next row of the edge of the hood using a slst. (4) Turn
Repeat rows 2 and 3 until you get all the way round, fasten off and sew the last row to the neck.
*COPYRIGHT 2025 This pattern is made for personal use only. You may not copy, share or sell this pattern, you may make and sell items made from my patterns but please credit me @BabyCrochetDesigns as the designer many thanks*

